Imageなどの既存のコンポーネントを使用せずに、Graphicクラスを継承したUI用のスクリプトを自作する記事です。
テンプレートコンポーネント
このテンプレートではImage相当の長方形を描画します。
テンプレート
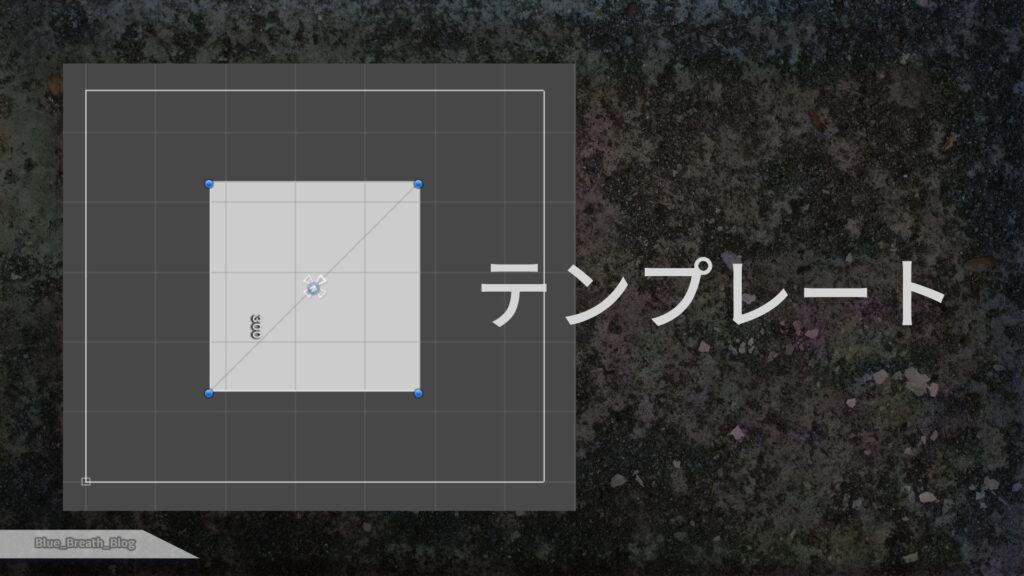
以下は単純なメッシュを描画するテンプレートを使用した説明です。
テンプレートスクリプト
using UnityEngine;
using UnityEngine.UI;
namespace BlueBreath
{
[RequireComponent(typeof(CanvasRenderer))]
[ExecuteInEditMode]
public class UIRendererTemplate : Graphic
{
protected override void OnPopulateMesh(VertexHelper vh)
{
vh.Clear();
this.RectCache();
this.Draw(vh);
}
private void Draw(VertexHelper vh)
{
UIVertex vertex = UIVertex.simpleVert;
vertex.color = this.color;
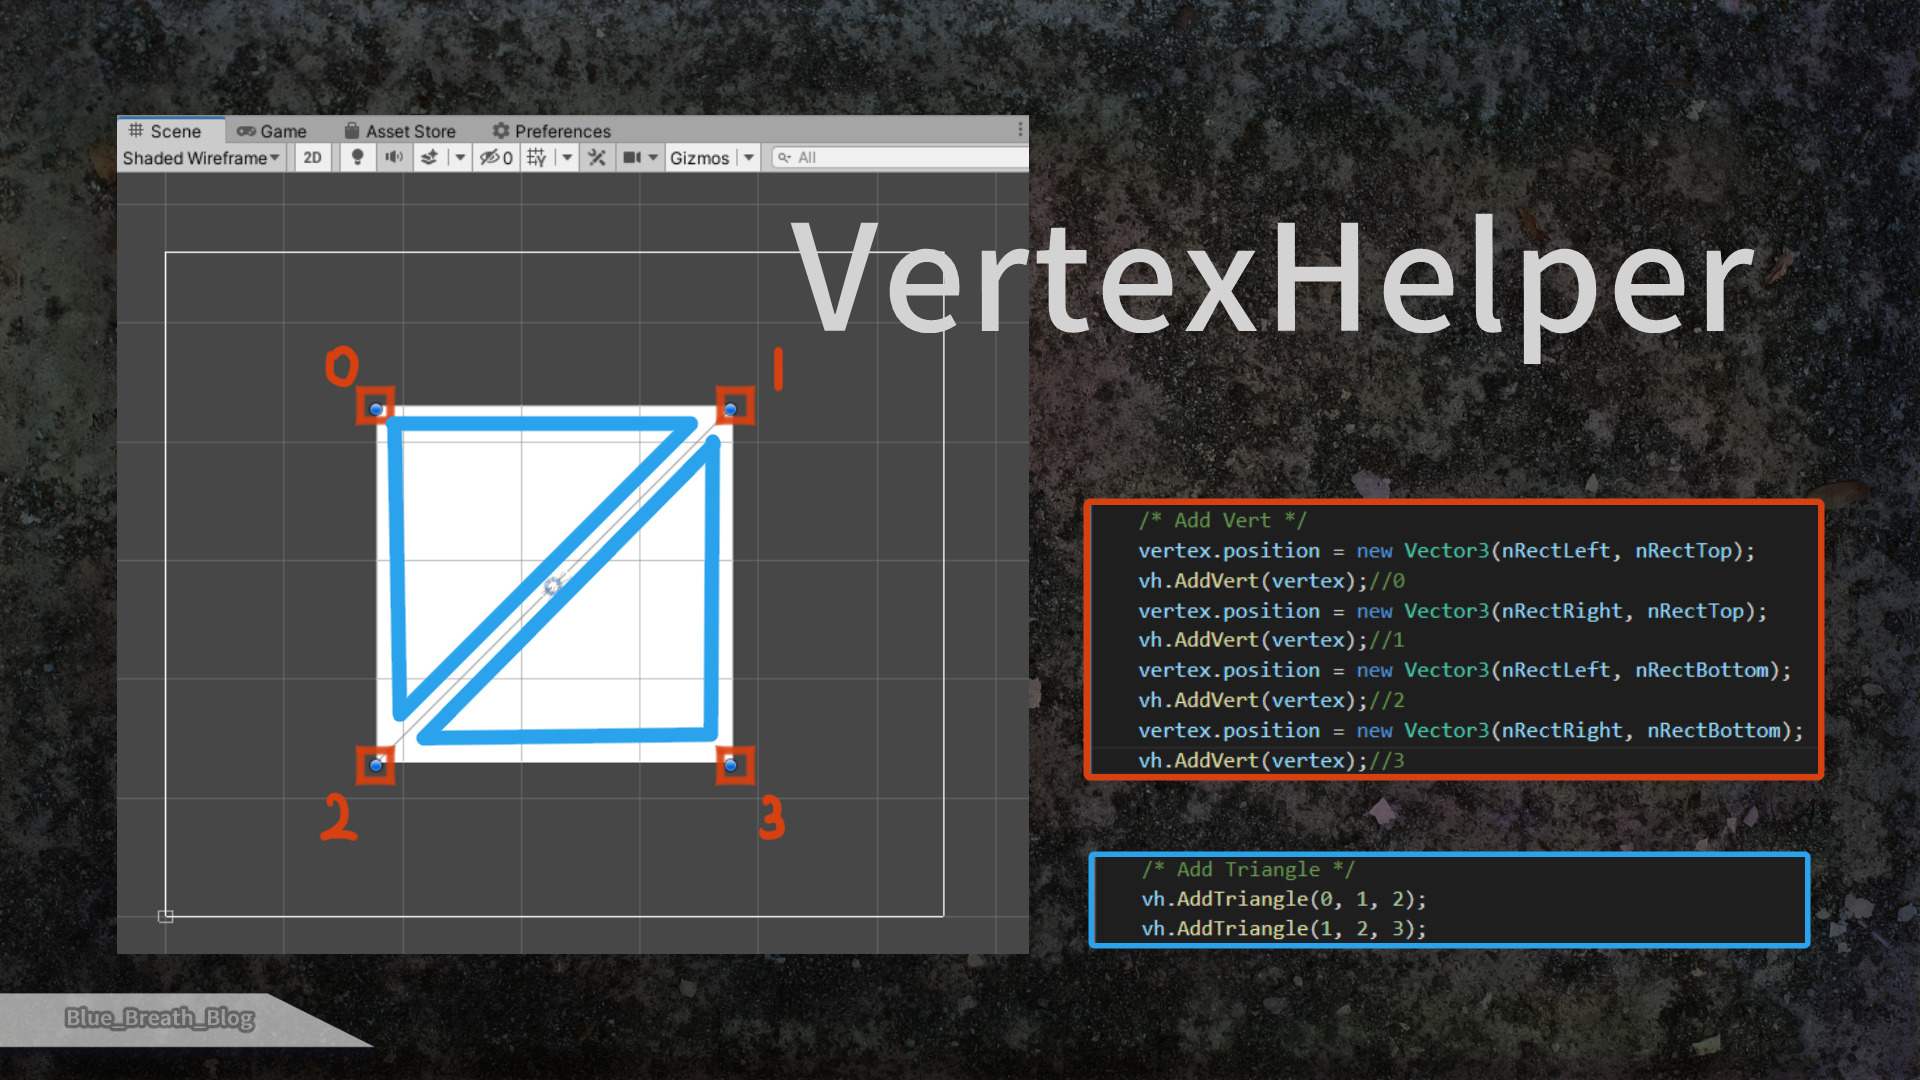
/* Add Vert */
vertex.position = new Vector3(nRectLeft, nRectTop);
vh.AddVert(vertex);//0
vertex.position = new Vector3(nRectRight, nRectTop);
vh.AddVert(vertex);//1
vertex.position = new Vector3(nRectLeft, nRectBottom);
vh.AddVert(vertex);//2
vertex.position = new Vector3(nRectRight, nRectBottom);
vh.AddVert(vertex);//3
/* Add Triangle */
vh.AddTriangle(0, 1, 2);
vh.AddTriangle(1, 2, 3);
}
/* RectTransform Cache */
float anchorLeft, anchorBottom, anchorTop, anchorRight;
float pivotX, pivotY;
float posX, posY, posZ;
float width, height;
float paddingTop, paddingBottom, paddingLeft, paddingRight;
//Extensions
float pCLeft, pCBottom, pCTop, pCRight;
float nRectLeft, nRectBottom, nRectTop, nRectRight;
private void RectCache()
{
//Anchors
anchorLeft = rectTransform.anchorMin.x;
anchorBottom = rectTransform.anchorMin.y;
anchorTop = rectTransform.anchorMax.y;
anchorRight = rectTransform.anchorMax.x;
//pivots
pivotX = rectTransform.pivot.x;
pivotY = rectTransform.pivot.y;
//width & height
width = rectTransform.rect.width;
height = rectTransform.rect.height;
//一致したアンカーとピボットの位置の差
posX = rectTransform.position.x;
posY = rectTransform.position.y;
posZ = rectTransform.position.z;
//アンカーから内部方向へのパディング
paddingLeft = rectTransform.offsetMin.x;
paddingRight = rectTransform.offsetMax.x;
paddingTop = rectTransform.offsetMax.y;
paddingBottom = rectTransform.offsetMin.y;
//ピボット中央に合わせる場合のUIVertex矩形座標
pCLeft = - width / 2f;
pCBottom = - height / 2f;
pCTop = height / 2f;
pCRight = width / 2f;
//ピボットに影響されないUIVertex矩形座標
nRectLeft = - pivotX * width;
nRectRight = (1 - pivotX) * width;
nRectTop = (1 - pivotY) * height;
nRectBottom = - pivotY * height;
}
}
}テンプレート作成基礎として、次の3点の説明になります。
- Graphic:UIコンポーネント基本クラス(メッシュ生成コールバックを呼び出す)
- VertexHelper:メッシュの生成(頂点情報を追加)
- UIVertex:頂点情報
Graphic:UIコンポーネントの基本クラス
名前空間
using UnityEngine.UI;継承
Graphicコールバック関数(OnpopulateMesh)
        protected override void OnPopulateMesh(VertexHelper vh)
        {
            vh.Clear();
            this.RectCache();
            this.Draw(vh);
}コールバック関数OnPopulateMeshでは、VertexHelperユーティリティーを用いてUIメッシュを生成します。
※テンプレート内RectCache()は、RectTransformと矩形の表示を一定に保つ値のキャッシュです。不要な場合削除できます。
VertexHelper:UIのメッシュを生成するために使用するユーティリティークラス

作成を行う手順
- VertexHelperをリセットする(vh.Clear)
- 頂点の情報を作成する(UIVertex vertex)
- 頂点情報をVertexHelperに追加する(vh.AddVert(vertex))
- 3つの頂点から三角形を作る(vh.AddTriangle)
- 三角形の固まりで表現する
名前空間
using UnityEngine.UI;Clear:メッシュ情報をリセットする
AddVert、AddTriangleの前に呼び出して、VertexHelper内の頂点、メッシュの情報をリセットします。
AddVert:頂点の情報を追加
public void AddVert(UIVertex v)1つの頂点情報を追加します。
頂点情報については次のUIVertexで管理します。
挿入順によって0から「頂点の番号」が割り当てられます。
AddTriangle:頂点から三角形を描画
public void AddTriangle (int idx0, int idx1, int idx2);positions配列のインデックスを3点与え、三角形を描画します。
idx0, idx1, idx2の値はそれぞれ、AddVertの挿入順「頂点の番号」と対応しています。
UIVertex:頂点情報を管理する構造体
名前空間
using UnityEngine;UIVertexの座標
UIVertex.positionはpivotの位置を(0, 0)としている為、他のUIコンポーネントのように(テンプレートキャッシュ内)
例1)pivot(0.5, 0.5)で中央に描画する場合は幅と高さの半分ずらします。
例2)nRectの値は、青のドットで囲われているGizmoと同じ場所を示します。
            //ピボット中央(0.5, 0.5)に合わせる場合のUIVertex矩形座標
            pCLeft   = - width  / 2f;
            pCBottom = - height / 2f;
            pCTop    =   height / 2f;
            pCRight  =   width  / 2f;
            //ピボットに影響されないUIVertex矩形座標
            nRectLeft   = - pivotX * width;
            nRectRight  = (1 - pivotX) * width;
            nRectTop    = (1 - pivotY) * height;
            nRectBottom = - pivotY * height;
編集中にUIを表示する属性
[ExecuteInEditMode]ExecuteInEditModeはスクリプトのインスタンスをEditモードで実行する属性です。
通常Playモードでなければ表示されませんが、これを付加する事によってコンポーネントの配置を可視化します。
プレハブが考慮されておらず廃止される可能性があります。
※無くとも動作する場合があり、その際は削除可能です。
補
代替属性としてPlayモードの一部として常に実行する、
[ExecuteAlways]が存在します。
この属性を使用する場合は、Editモードであっても値が書き換わるため、
Application.IsPlayingを使用した条件分岐によって、編集中と実行中の処理を分ける必要があります。
ワイヤフレームの表示
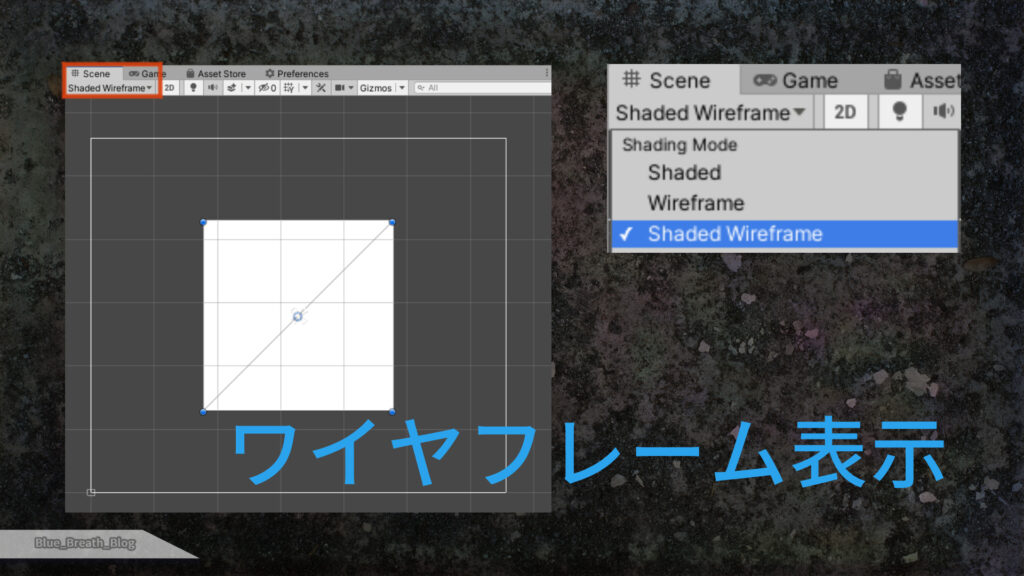
AddTriangleで正常に三角形が追加されている事を確認します。
SceneタブのShading ModeをShaded Wireframeに変更する事で表示されます。
参考・その他
参考
Unity DOCUMENTATION
資料
感想
スクリプト書く系はリファレンスくらいしか参考が無かったので、メジャーなやり方では無いかもです。

コメント